We've already looked at how to use the Blackberry as an e-book reader but what about when you're feeling particularly lazy? Talking books are the answer.
You can use the inbuilt Blackberry Media Player but since it has limited capabilities, particularly for browsing (unless you use trickery), I prefer to use the free xPlayer.
Recording your Book from an Existing CD
If you've already got a talking book on CD, you can simply record it using Windows Media Player's RIP facility. These instructions refer to Windows Media Player 8, but you can use other versions and indeed other "rippers".
Repeat this procedure for any other CDs in the set, though you won't have to repeatedly set the defaults.

Getting the files onto your Blackberry
Note that since these files can get large, you might want consider adding a MicroSD card to your BlackBerry for additional storage.

Playing Back the Files
To resume interrupted play, Click the Menu button (Blackberry Button) and choose Resume
Finding FREE Talking Books on the Internet
So far, I've only talked about ripping from existing CDs but you can find free Talking Books on the internet.
There's a big talking books conversion project at Project Gutenberg - Note that some of these are computer read, so they may lack a bit of expression.
http://www.gutenberg.org/wiki/Gutenberg:The_Audio_Books_Project
There are other audio book sites which offer free samples, though some will need you to do free registration before you can download anything;
http://www.audiobookquest.com/
http://www.audiobooks.org/
http://www.audiobooks.net/
http://storynory.com/
There are also a lot of fan-fiction sites around for example;
Doctor Who: http://www.westlakefilms.co.uk/season27.html
I'm sure that if you look up your favourite science fiction TV Series or movies, you'll find something.
You can use the inbuilt Blackberry Media Player but since it has limited capabilities, particularly for browsing (unless you use trickery), I prefer to use the free xPlayer.
Recording your Book from an Existing CD
If you've already got a talking book on CD, you can simply record it using Windows Media Player's RIP facility. These instructions refer to Windows Media Player 8, but you can use other versions and indeed other "rippers".
- Insert the CD into your CD-ROM Drive
- Click Cancel on the AudioCD Autorun Prompt (it's safer to do things manually)
- Start Windows Media Player
- Click on the Library Tab, then the Little Arrow beneath the word library, this pops up a menu.
- On the Menu, select More Options... This will display a dialog box.
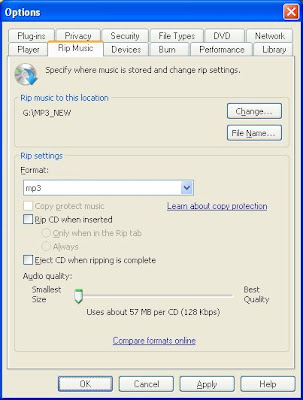
- In the Dialog box, click the Rip Music Tab.
- Look at the Location to Rip Music to. This usually points to your personal profile on the PC. You might want to change this do a good size drive and more accessible folder (eg: D:\RIPS)
- Now Click the Filename button; Talking books need to be read in exact order, otherwise they won't make sense. You need to makes very certain that Track Number is included as part of the filename - so tick this box (Note: You probably won't want this on music, so remember to turn it off again later). On talking books, you probably won't want Artist information, just Song title - but again, you'll want to change this setting back later for Music CDs. Click Ok to close this box.
- In the format drop down, you need to choose either MP3 or Windows Media Audio. If space is a major issue, then Windows Media Audio is probably the best choice as it makes smaller files. Personally, I prefer MP3 because it's a more standard format and will work on more systems.
- Finally, you need to select an audio quality. Note that the higher the quality, the bigger the file. (an estimate is displayed at the bottom of the dialog box). I tend to stick at around 192 kbps for music but you could probably drop to 128 for a talking book without too much trouble.
- Click OK when finished.
- Now, click on the RIP Tab
- Look at the bottom of the screen to make sure that the album isn't playing (windows has a habit of automatically playing CDs and this can significantly add to RIP times).
- Make sure that all the tracks on the CD are ticked
- If you're ripping a multi-CD set, make sure that the album title says Disc 1 (or whatever disc it is) at the end. If it doesn't, right click on the title, and choose Edit. Add the disc designation - This causes the files for each disc to be stored in different folders and prevents mixing up of tracks on discs.
- Click on the Button marked Start Rip (very bottom of the screen). If you can't see this button, you can click on the arrow at the bottom of the Rip Tab and choose to rip from there.
Repeat this procedure for any other CDs in the set, though you won't have to repeatedly set the defaults.

Getting the files onto your Blackberry
Note that since these files can get large, you might want consider adding a MicroSD card to your BlackBerry for additional storage.
- Connect your Blackberry Handheld to your Computer
- Start the Blackberry Desktop Manager Software
- Double-Click Media Manager
- In the Right hand panel...
- If you have a media card, double-click on this, otherwise, you'll have to use the device memory.
- Create a new folder (Right-Click and Choose New Folder) - Call it something obvious like "Talking Books"
- Go into the new folder by double-clicking on it.
- Note: If you've finished with books in this folder, you can right-click on their folders and choose Delete. This is a good habit as it keeps your storage free.
- In the Left hand panel, browse to where Media Player saved the files from the talking books (eg: D:\RIPS). Go down until you see the folders for your current book (eg: ending in Disc 1 etc..) but don't open them (except perhaps to check their contents).
- At the folder level, Click on the folders and then click on the Arrow to copy the folders to your blackberry. Depending on memory and the size of the book, you might only be able to fit a couple of CDs on at a time.
- Once the copy has finished, close Blackberry Manager
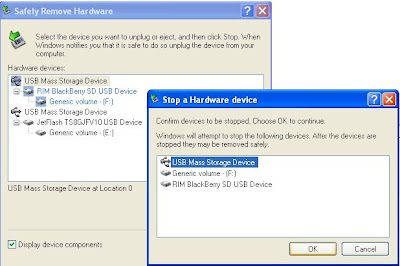
- Disconnect the Blackberry from the computer using the "safely remove hardware" icon near the system clock - (Hopefully people do this - if you don't you could corrupt your BlackBerry)
- When it says that it's safe to remove hardware, then disconnect the USB plug.

Playing Back the Files
- Connect Earphones to your BlackBerry and to your head (otherwise it gets embarrassing).
- Open the xPlayer application
- Click the Menu button (Blackberry Button)
- Choose Clear Playlist (in case there's already stuff there)
- Click the Menu button (Blackberry Button)
- Choose Add Folder
- Browse to the folder - possibly SD Card then Talking Books - Stop at the folder level, don't go into it.
- Click the Menu button (Blackberry Button)
- Choose Select
- All of the Files in the folder will appear in the MP3 Player.
- Click the Menu button (Blackberry Button)
- Check very carefully that it says Shuffle ON (this means that you could turn the shuffle on, but it's off at the moment). Leave it off.
- Choose Play
- You can now put your blackberry back in the holster and continue to listen to your book.
To resume interrupted play, Click the Menu button (Blackberry Button) and choose Resume
Finding FREE Talking Books on the Internet
So far, I've only talked about ripping from existing CDs but you can find free Talking Books on the internet.
There's a big talking books conversion project at Project Gutenberg - Note that some of these are computer read, so they may lack a bit of expression.
http://www.gutenberg.org/wiki/Gutenberg:The_Audio_Books_Project
There are other audio book sites which offer free samples, though some will need you to do free registration before you can download anything;
http://www.audiobookquest.com/
http://www.audiobooks.org/
http://www.audiobooks.net/
http://storynory.com/
There are also a lot of fan-fiction sites around for example;
Doctor Who: http://www.westlakefilms.co.uk/season27.html
I'm sure that if you look up your favourite science fiction TV Series or movies, you'll find something.
Comments
At some point, when I get around to figuring it out, I'll do a post on converting and watching videos on the Blackberry.
Alan Bell
http://www.dominux.co.uk