Improving Productivity
It's all great news that Lotus Notes 8.0.1 and above support Google Gadgets. A brilliant move IBM.
The problem is that most of the demonstrations show you how to add really useful things, like personal fish-tanks to the Notes client. (Thanks Alan Lepofsky - a brilliant demo btw) rather than business productivity applications. It was hard to see the immediate business value of gadgets and even harder to sell it to the business.
Thankfully now, I've got a good and simple example.
I'm not sure if my behaviour is unique but somehow I expect that it's not. I often find that when I am working in Lotus Notes and other applications that I am constantly copying data to notepad and making notes around it. On other occasions, I am following a particular list of requirements (again, usually part of a document pasted into notepad).
Not too long ago I got myself a 22 inch wide-screen monitor. This has proved to be fantastic because I have been using notes in a normal square screen and having notepad arranged down the right-hand side. As I went to set this arrangement up yet again this morning, I thought to myself, why don't I get a pre-existing Google Gadget to do this for me?
I went to add a Google Gadget to do this but I'd already forgotten how to do it and when I looked at Alan's excellent instructions, I couldn't even find the icon. This is because I have completely reinstalled Notes 8.5 on my machine and the default is to have Google gadgets off.
Turning Google Gadget functionality on
From the Lotus Notes menu select file and then preferences. In the left-hand column select widgets and then in the right-hand panel click the checkbox marked [X] Show widget Toolbar and the my widgets sidebar panel. Click on apply and ok.

The Widget toolbar should now display.

Adding a suitable Widget
Next, we have to find a suitable widget. Click on the getting started with widgets (jigsaw puzzle) icon. This will bring up a dialogue box.
In the first dialogue box, choose Google gadgets and click next. In the second dialogue box, choose browse the Google Gadget directory and click finish.
Lotus Notes will now display a webpage, the Google gadgets directory. My Web browser is set to Firefox but notes was smart enough to know that I needed to displayed in the notes client. Well done IBM.
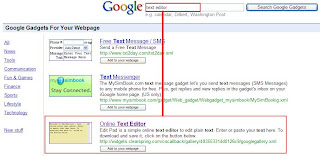
It took a few goes to find a suitable Gadget and at first I was using the word notepad to search. When I changed this to "text editor" I found a good online text editor called edit pad. I clicked on this gadget to read more about it.

The last step is so simple that I kept missing it and wondering what I was doing wrong. With the webpage displayed, all you need to do is click on the Add to Sidebar icon on the widgets icon bar.

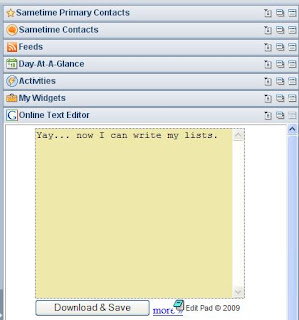
So now, I have a notepad embedded in the Notes client that I can use.
I'm sure that someone is bound to suggest that I could have written a notes app to do this but I'm sure it would have taken longer and in any case, I haven't yet tried to write a sidebar app.

It's all great news that Lotus Notes 8.0.1 and above support Google Gadgets. A brilliant move IBM.
The problem is that most of the demonstrations show you how to add really useful things, like personal fish-tanks to the Notes client. (Thanks Alan Lepofsky - a brilliant demo btw) rather than business productivity applications. It was hard to see the immediate business value of gadgets and even harder to sell it to the business.
Thankfully now, I've got a good and simple example.
I'm not sure if my behaviour is unique but somehow I expect that it's not. I often find that when I am working in Lotus Notes and other applications that I am constantly copying data to notepad and making notes around it. On other occasions, I am following a particular list of requirements (again, usually part of a document pasted into notepad).
Not too long ago I got myself a 22 inch wide-screen monitor. This has proved to be fantastic because I have been using notes in a normal square screen and having notepad arranged down the right-hand side. As I went to set this arrangement up yet again this morning, I thought to myself, why don't I get a pre-existing Google Gadget to do this for me?
I went to add a Google Gadget to do this but I'd already forgotten how to do it and when I looked at Alan's excellent instructions, I couldn't even find the icon. This is because I have completely reinstalled Notes 8.5 on my machine and the default is to have Google gadgets off.
Turning Google Gadget functionality on
From the Lotus Notes menu select file and then preferences. In the left-hand column select widgets and then in the right-hand panel click the checkbox marked [X] Show widget Toolbar and the my widgets sidebar panel. Click on apply and ok.

The Widget toolbar should now display.

Adding a suitable Widget
Next, we have to find a suitable widget. Click on the getting started with widgets (jigsaw puzzle) icon. This will bring up a dialogue box.
In the first dialogue box, choose Google gadgets and click next. In the second dialogue box, choose browse the Google Gadget directory and click finish.
Lotus Notes will now display a webpage, the Google gadgets directory. My Web browser is set to Firefox but notes was smart enough to know that I needed to displayed in the notes client. Well done IBM.
It took a few goes to find a suitable Gadget and at first I was using the word notepad to search. When I changed this to "text editor" I found a good online text editor called edit pad. I clicked on this gadget to read more about it.

The last step is so simple that I kept missing it and wondering what I was doing wrong. With the webpage displayed, all you need to do is click on the Add to Sidebar icon on the widgets icon bar.

So now, I have a notepad embedded in the Notes client that I can use.
I'm sure that someone is bound to suggest that I could have written a notes app to do this but I'm sure it would have taken longer and in any case, I haven't yet tried to write a sidebar app.

Comments
http://symphony.lotus.com/software/lotus/symphony/plugin.nsf/web_DisplayPlugin?openform&unid=8F3F6FAE6DDF0A0F852574B3002AF8D8