
Erasing Backgrounds in PowerPoint

Article Title: Erasing Backgrounds In PowerPoint

I'm a big fan of PowerPoint these days and I use it for a lot of great things, most of which aren't presentations. It's great for drawing small flowcharts, business diagrams and logos. It's also great for recording the screen.

Here's a walk through of how to add an image into PowerPoint and then make the background of that image transparent.

Get Your Images

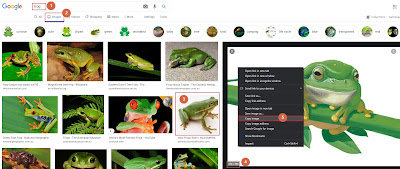
  1. Go to Google, and do a search for something that sounds interesting.
  2. When the search results appear, click on Images. This will restrict the display to just images. 
  3. Choose an appropriate image (ideally one without too much background). 
  4. The image will appear on the right hand side. Check the size of the image to make sure that it's a good size. images below 700 wide x 500 high will probably not look very good on a large screen - and any images over 2000 wide 1500 might make your presentation a little large/slow. 
  5. Right mouse click on the image and choose Copy Image, then switch to PowerPoint and paste the image in (Ctrl+V) 
Getting an image from Google

Removing Simple  Backgrounds

If your background is simple (a single colour), you can use the following method to make it transparent;

  1. Click on any part of the picture.
  2. At the top of PowerPoint, click on the Picture Format tab on the ruler. 
  3. Click on the down arrow next to Colour.
  4. Choose Set Transparent Colour
  5. Click on any white area of the picture. (or if your picture has a different colour background, click on that). 

steps to remove a simple background

Your picture will immediately become transparent. 

Note that if your picture has the background colour in it somewhere, there's a chance that it will become transparent where you don't want it to be. 

Removing Complex Backgrounds

If you have a more complex background you need to use a different method to remove them. 


  1. Click on any part of the picture.
  2. At the top of PowerPoint, click on the Picture Format tab on the ruler. 
  3. Click on the button marked Remove Background.
  4. The background will go all purple. It won't be perfect but that's okay for now. 
  5. Click on the button labelled; Mark Areas to keep
  6. You'll be able to draw around and/or colour in areas that you want to keep in green pen. When you've selected what you want, just double-click and PowerPoint will adjust its settings. 
  7. You'll also no doubt have things that need to be removed, so click on the button labelled Mark Areas to Remove.
  8. Draw around and/or colour in areas that you want to remove in red and then double-click to get PowerPoint to do its work.  
  9. You'll be able to see the effects in the slide preview window
  10. Double-check everything and if you're happy with it, just click Keep Changes and your transparency will be applied immediately. 
If you accidentally click outside the purple area or keep changes before you're ready, you can press Ctrl+Z (undo) to go back to where you were without losing all your other changes

Steps to Remove Complex Backgrounds


Enjoy.

Money image with complex background removed.


Comments

Popular posts from this blog

How to Change Your Notification Options for New Lotus Notes Mail in version 8.x

Don't worry, I'm not patronizing you (my readers), I just decided to re-document this for one of our internal users and thought you might want to be able to use it in your own user documentation. WHAT IS THIS DOCUMENT ABOUT? Some people who don't get a lot of mail, like to be notified when such an event occurs. Notification can be; via a sound via a pop-up box via the system tray (where the computer clock is) The pop up box looks like this; Other people, who like myself, get too much mail would rather not be notified. The aim of this document is to tell you how (and where) to turn these options on and off. CHANGING YOUR SETTINGS To change your settings from the Notes 8.x client; On the Menu, click File , then Preferences... On the left hand side , click on the little plus sign to the left of Mail to expand the options. Click on the option marked Sending and Receiving . In the middle section, under receiving, you can control your notifications. If you untick the box mark

How to Create an Auto-Response Mail Message in Lotus Notes 8.5.3+

Why would you do this? Suppose that you have an externally accessible generic email address for your company; support@mycompany.com or info@mycompany.com. You might expose this to the web and allow people to send messages to you. Setting up an auto-response email will tell the senders that their message reached its destination and that it will be dealt with accordingly.  It's also good practice to include links to FAQs or other useful information. Why 8.5.3 The techniques we'll be using here work in older versions of Notes but some of the options seem to have moved around in 8.5.3.  I figured it was a good time to show you where they've moved to. The Procedure Start Domino Designer and open the Mail file to be modified.  A really quick way to do this is to right-click on the application tab and choose "Open in Designer". In the Left hand panel of designer, expand Code and then double-click Agents.  A new window should appear. Click the action

How to Do a Mail Merge to Email using Lotus Notes

Why do one? In today's "green" world, it makes much better sense to send out emails than letters but you still want to personalize them. Sadly, by itself Lotus Notes doesn't support mail merge to email. Of course, we know that outlook does (but then it lets anyone and anything send emails for you - even when you don't want them to). So, how to do it in Notes? OpenNTF The first port of call is OpenNTF ( http://www.openntf.org/ ). This place is full of great things but most of them are really badly documented. Still, these guys give things away for free and they develop in their spare time, so we should be grateful for what we get. There's a great little project there called MailMerge Excel to Notes . Go there, click on releases and download the ZIP file. Getting to the Code The installation is tricky though I've noted that since I asked the author about the install, it's been updated (so maybe these steps are less necessary). Unzip the files to somewher