Teams or SharePoint
Both!
Teams IS SharePoint. (okay, so we know they're separate applications but I've had to labour this point for the sake of our staff). Teams and SharePoint are two parts of the same thing and they can't exist without each other. You'll find that sometimes SharePoint is more appropriate and sometimes teams is. It doesn't matter. You can switch between the two as needed.
- Teams is essential for meetings.
- SharePoint is best for browsing through files.
Why Create a Teams Site?
You should create a teams site for any of the following reasons;
- You want to text-chat regularly with a group of people (internal and/or external)
- You want to be able to share files regularly with a group of people.
- You're collaborating on a project or working group.
- You have a group that has regular meetings with, particularly online and ad-hoc meetings.
- You want to create a SharePoint site for a group of people to use.
First Steps
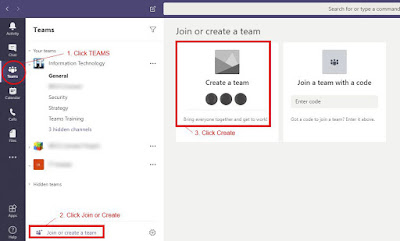
1. Go to the Microsoft Teams Site - or open the Teams App.
2. In the left hand panel click on the TEAMS icon (usually about 3rd down).
3. At the bottom of the left hand panel, click Join or Create a Team.
4. You'll be prompted to either;
- Build a team from scratch
- Create from and existing Office 365 group or team.
5. Unless your team already exists as a proper Office 365 group, Choose to build from scratch.
6. The next question is what type of team do you want.
You will ALMOST ALWAYS want a private team.
It sounds wrong but you must select "private team" in order to add any external guests.
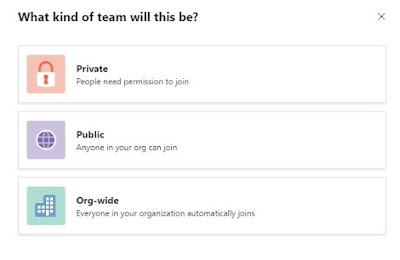
Private or Public?
This bit is is really confusing.
- Private means that the team is "inaccessible" to everyone until they're asked to join.
- Public means that the team is accessible to everyone in your organisation (but not EVER, to any members).
- Org Wide means that everyone in your organisation is already a member.
If you are going to have ANY (non-staff) members in your team,
Be sure to choose Private
Choosing a Team Name
The next steps require you to choose a team name. There are a few things to be aware of;
- The Team name is extremely "Visible" and a little hard, though not impossible, to change .
You need to try to get the spelling PERFECT first go.
Even when you do change a team's name, traces of the old one will probably remain (for example in the team's URL). - Shorter Team names work better as they don't have to wrap so much.
For example: "ABC Technology and Security SC" rather than "ABC Technology and Security Sub Committee (ABCTSSC)" - The name feeds into the site's URL (which makes links longer).
You can always put the longer name (and dates) into the description. - You can use an existing name but it's not recommended
It's certainly possible to create five teams all called "Board of Directors" but this isn't helpful. If your team is for a specific board, you should name it after that board (eg: ABC Board of Directors".
That way someone won't accidentally use it when emailing. - If your team isn't the whole group, don't name it like it is
If you're going to have a team called "Board of Directors", then make sure that it really does have all of the board of directors in it. Otherwise, it just becomes confusing to people.
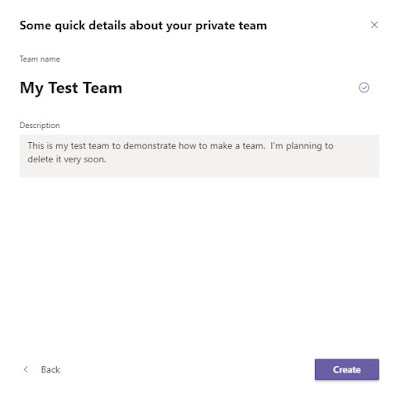
7. You'll be asked to provide a name and description for your team.
Type these in and click CREATE.
Adding Staff
8. Now that your team has been created, you'll be prompted to add people.
- When people are added to the team, they're notified immediately, so often it's best to get some content into the team before adding external clients.
- Add Internal Staff Members Now, leave External Clients until later.
- To add a staff member, just start typing their name.
- If you wanted to add an external member, you will need to type their email address
Creating File Structure
Your New Team should already have a General Channel established. These are created by default. Now it's time to create a file structure to work in. You'll want to think carefully about your file structure before you create it but you can change it any time if you need to.
- Click on your Team.
- Click on the General Channel.
- In the Right Hand Pane, click on the Files Tab.
- On the menu at the top of the pane, select New.
- Choose Folder.
- Type a Folder Name and Press Enter.
- Repeat Steps 4-7 until you have your folders (and sub-folders if you want) created.
File Structure Options
The file structure that you need will vary from one type of committee or team to another. You'll need to consult your organisation's best practice to determine what works for you but for the time being, here's a sample of what you could use; (folders and sub-folders)
- Meeting No 145 (8 May 2020)
- Agenda
- Memos
- Minutes
- Presentations
- Meeting No 144 (7 Feb 2020)
- Agenda
- Memos
- Minutes
- Presentations
- Meeting No 143 (8 Oct 2019)
- Agenda
- Memos
- Minutes
- Presentations
Separating things by meeting will make it easier for your clients to get to the meeting materials that they need. Having numbers in meeting names makes it easy to sort the meetings and having the actual meeting date at the end of the filename will give your clients reassurance that they're clicking on the right thing.
If your meetings aren't so structured, you might not have all the separate sub-folders and if your team is a projects rather than a meeting team, you might use a different main folder structure, perhaps key documents and iterations or sprints.
Welcome to SharePoint
As mentioned earlier, Teams and SharePoint are the same thing. So our next step is to make sure that you know how to get to SharePoint.
- Open the Team
- Click on the three dots menu in the top right hand corner.
- Choose Open in SharePoint.
- You should be able to see the folders you created earlier.
- This should take you to the familiar SharePoint Interface. It's recommended that you bookmark the SharePoint site so that you can easily find your way back here.
You'll notice that your Teams files are stored under;
SharePoint Library \ Documents \ Channel Name \
So it's easy to determine what would happen if you created more channels.
Adding a Team Icon
While it may seem frivolous, adding a team icon will make it easier for you to find you team and less likely that you might post in the wrong team.
Obtaining a Graphic
To add a teams icon, you need a graphic (a square of about 400 x 400). You can search and download one on the internet (try this link and change the search word to something you need) - right mouse click and do a File, Save As (JPG) on the image.
Alternatively you can create an icon in PowerPoint
Replacing the Graphic
In teams,
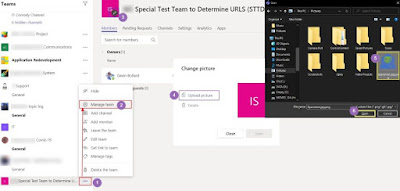
- Click on the three dots to the right of your team name.
- In the menu choose, Manage Team.
- In the Manage Team dialog box, hover over the icon and click the Pencil icon when it appears.
- When the Change Picture Dialog box appears, click Upload Picture,
- A file browser window will open, select your file.
- Click Ok
- Click Save and then Close and the new icon will take effect.
Adding Guests/Clients
In teams,
- Click on the three dots to the right of your team name.
- In the menu choose, Manage Team.
- Click Add Member
- Type your client's email addresses. You'll be able to add them as guests.
- Note that they'll get a notification as soon as you add them -- even if you haven't clicked Ok - So make sure that there's no test data in your team.
Creating Channels
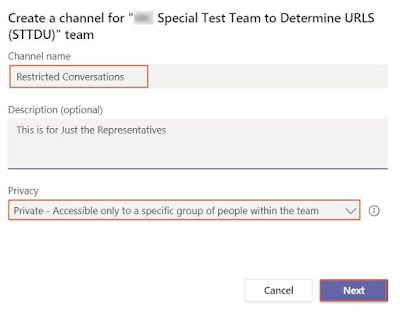
To create a channel,
- Click on the three dots to the right of your team name.
- Choose Add Channel.
- Give the channel a short name and description.
- By Default the Channel is open to the same security as the rest of the team but you can change it to be a subset of the Channel by selecting Private.
- Click Next.
- You'll be prompted to add the users who should be in the Channel (you can change this later).




Comments